Wednesday, April 27, 2016

Chiming Bells linocut: The Finish

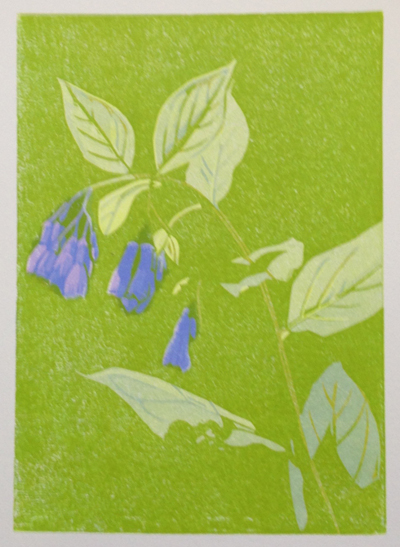
"Chiming Bells," reduction linocut, 7" x 5", edition of 20-something!

The title of this post should probably be "Chiming Bells Linocut: The Poorly Documented Finish," but hey...

I'm sort of jumping the gun by putting the final image at the head of the post, but since I neglected to take photos of one of the intermediate steps I figured I'd go ahead and let you see how it ended and you can skip the rest if you like.

Lots of things conspired to keep me from performing my documentation duties this past week. I had company. I had a birthday. I had a cold. I had an exhibition opening in another part of the state. (And I won an award there, too. Yay!) Excuses, excuses, I know. But after all that it felt really good to finally get back to the studio and wrap this up.

If you're still with me after all this whining, here's the one intermediate step that I did photograph:

Chiming bells linocut almost finished, Step 14.

I liked the darker teal green color in the background, but it still didn't seem quite rich enough. I carved a little more and printed a transparent brown... which I quite liked but of course neglected to photograph. I also liked putting some subtle shapes in the background instead of just that flat dark, so I carved a few more leaves and stems and hit the whole thing with one more pass of the dark blue-brown after that and called it done.

As for that award I mentioned... "Dinner Party" won an Award of Merit at the Colorado Governor's Show this past weekend. The show continues at the Loveland Museum through May 29. Do try to give it a look if you're in the neighborhood. Although I'm sorry to say that you've already missed the "La Traviata" flash mob performed at the opening by the Loveland Opera, but you can see a video here.

"Dinner Party," reduction linocut won an Award of Merit at the Colorado Governor's Show.


Tuesday, April 19, 2016

Not-so-high-tech drying rack, AKA The Flexible and Useful Clothespin Stick

I've written a couple of times about my funky little DIY print drying rack, but there's been some interest in it again so I thought it might be time for a more detailed explanation.

I've used this basic clothespins-attached-to-a-stick idea in a number of different ways to accommodate different working situations. If you don't print very often you can even just make a "clothespin stick" and lay it across the tops of two chairs when you need it. When you're done, prop it up in the corner of a closet and put the chairs back in the kitchen.

Materials for your clothespin stick:
  • 1" x 2" x whatever-length-works-in-your-space lumber
  • Wooden clothespins
  • Screws of a diameter to fit through the spring of the clothespin and long enough to go through the width of the clothespin and into the 1 x 2 (I think mine were about 1" long.)


My pins are attached about 2.5" apart, which gives me room to maneuver and lets air get in around the prints. In the earliest iteration of this system I suspended the "clothespin stick" from the ceiling with plant hooks and a pulley so the rack could be raised and lowered to keep it out of the way.

The "original" rack hanging from the ceiling.

And now raised up and out of the way via pulley. There's a coat hook
on the wall to hold the pull string in place.

In my current working situation, however, I am not able to attach anything to the ceiling. My space is very small, so I needed to come up with something that wouldn't take up too much space but would also be movable.

Enter the garment rack.

This is not the exact same model as mine, but it's similar in design and price: $20 (USD).  (This one from Home Depot.)


I attached a "clothespin stick" to the horizontal bar on the garment rack by winding around both with (blue painter's) tape. Something about the way the two braced together made them really sturdy. I thought the tape was only going to be a temporary solution, but it's been on there for more than two years now. If it ain't broke, don't fix it.


Later I suspended a second clothespin stick below the first with string. First I put eyelet screws in the top of both ends of the stick.


I tied one end of a long piece of string though the eyelet and tied the other end around the horizontal bar of the garment rack. I did this twice, of course, once on each end of the stick.

The strings are long enough that I can lower the second clothespin stick and accommodate large prints top and bottom.  If I'm working on smaller pieces (as I am now) I can raise the stick up by looping the strings around the end of the garment bar a couple times. Like this.


From the end it looks like this:


I'm sure there are plenty of ways to tweak this design, but it's been working great for me. After... him... at least 8 years... some of the clothespins have broken and need to be replaced, but that's the extent of maintenance. So go out and build yourself a clothespin stick and then MAKE MORE PRINTS.

Sunday, April 17, 2016

Linocut in Progress: Suddenly the end is near!

I guess the good news about small linocuts is that once you find a block of time (and resolve your idea), things can move along quickly. This piece is now just one or two steps away from completion.

Reduction linocut in progress, Step 11

Aaaannnnd it's time to start playing with blended rolls. This one was a sort of medium green to lighter green, with the goal of subtly defining some background shapes.

And then another blend, this time a darker green to a medium, and more background shapes.

Reduction linocut in progress, Step 12

It's feeling a bit TOO green now, but I'm not quite ready to move entirely away from this palette. The next blended roll went from a violet to a green. It seems intense on the inking glass, but there's a lot of transparent base involved.


And a few more bits of background foliage appear.

Reduction linocut in progress, Step 13

The temptation now is to put a really high-contrast dark behind everything, but I think that might be too extreme. The shadows on a couple of the foreground leaves need to be strengthened, but I like the subtlety of the lower background as it is. I'm fairly certain that I want upper background to be darker, though... and maybe even a bit warmer in some areas.

Unfortunately everything is too wet now. I tried to pull another color this afternoon and promptly made a mess of the first "tester" print. With a big sigh I cleaned everything up and put it away for another day.

So, while it's all drying I'm going to poke around some sketches and see if I can get another piece started. The big bufflehead print FINALLY dried enough to stack and store so I have room on the drying rack again!

I'd like to get this finished this week, since next weekend I'm off to Loveland, Colorado for the opening of the Governor's Show. If you're in the area, it's an exhibition well worth a visit. At the Loveland Museum through May 29.

Wednesday, April 13, 2016

A brush to go with that baren

Progress on the little flower linocut has stalled this week for a couple of reasons, not the least of which is that I've managed to catch a wee cold. My stuffy-headed fog precludes making good aesthetic decisions and I don't have a whole lot of stamina for standing at the press.

Luckily I've got some "bitty birds" to work on. These are small single-color linos that I hand-paint with watercolor, and since I've finished several batches of them previously most of the aesthetic choices have already been made. There's a fair amount of variety between each individual print, although I keep the general color palettes the same. But yikes! Which end of this brush thingy am I supposed to use to make marks? There's no sharp bit to tell me which end is up.


It will be nice to have a fresh set of these ready for the Colorado Field Ornithologists convention in early May. It's been several years since I've been able to attend and even longer since my schedule has allowed me to put together a presentation of work for the event.

It will be a great opportunity to catch up with some friends and to visit an area of the state that I rarely explore. Can you say scissor-tailed flycatchers and Mississippi kites? Just think of the potential new lino subjects!

But first it's time for another cup of echinacea tea and a fistful of vitamin C.

Friday, April 8, 2016

Parting is such sweet sorrow


Longtime readers may remember that a few years back I acquired an old Challenge proof press from friends who were moving out of the country. I named her Presszilla.

I had big plans for her. I was going to clean her up, get her inking assembly working again, and launch into a sideline of artist's books. Sure, I'd have to buy some type. And some book-binding materials. And....

But time went by and I discovered I had neither space nor time to get Presszilla in order. She's been languishing in storage and my guilty feelings have multiplied.

Yesterday, however, she took off on a new adventure. She's on her way to a new home with folks in Virginia who will love and cherish her. Fare thee well, Presszilla! I can't wait to see what rolls off your press bed.


Thursday, April 7, 2016

Linocut in Progress: Wearing o' the green. Literally.

A month too late for St. Patrick's Day, but I've definitely got my green on with this linocut. I can't believe how long this little bitty thing is taking, but many projects are converging simultaneously and I'm struggling with time management.

Unfortunately, good camera skills are NOT one of the convergent realities, so sorry about this image:


Can you say, "Kinda blurry?"

It's a nice green, though... and it was amusing to realize that once again I had mixed a color that matched the shirt I was wearing while working. If you're following me on Instagram you likely saw this photo:


I've already blamed my lack of progress on an over-full calendar, which is true, but it's also true that there is probably an element of foot-dragging involved. I started this piece without a firm plan for the background, other than a final dark-to-light blend behind the blossoms.

Luckily I could do one more pass for the leaves and stem before I had to face the background issue. This time I mixed up a lovely transparent blue:


Which gave me......


GREEN! Of course. But a cooler one.

Funny thing is, I'm wearing a blue shirt today, but it's not transparent ultramarine. More like super-faded chambray.

The question of the background can no longer be ignored, but YIKES! I was expecting a truck to come and pick up a piece of equipment tomorrow (more on this saga later) but just got a call that they're on their way NOW. My reaction has been to stuff two cookies and a handful of almonds into my mouth and watch all my brain cells vanish in the resulting panic. Yes, it's packed up and ready to go, but I don't have any backup help arranged and I have to shuffle a couple of other appointments around. I've got an hour and a half. Better go figure it out.

Friday, April 1, 2016

Linocut in Progress: More lime green!

Because I can.

It's a wild-looking color, isn't it?


But it's okay. It looked really yellow on the lino block (not surprising, since I did put a lot of yellow in the ink mix.) It came out much more reasonable on the print. Hooray, transparent color!


Linocut in Progress: Color in a gray season

 Mud season came early to the midcoast this year. So. Much. Rain. Seemed like a great time to get started on a piece with a little more colo...